![]()
|
|
Fills |
PageStream offers four types of fills:
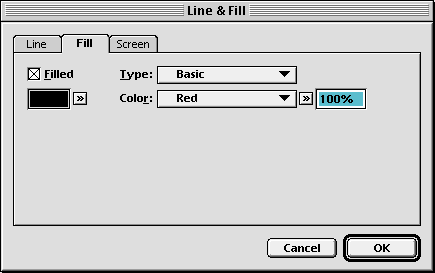
Select Basic from the Type pop-up menu to display the basic fill options.
To set the fill color: Select a fill color from the Color pop-up menu. Click the Browse button to create a new color or edit an existing color. Select Custom from the color pop-up and click the Browse button to define a custom color.To use a tint of a color without creating a new color, enter the percentage of the color to use into the text box beside the Color pop-up menu.
The Browse Button
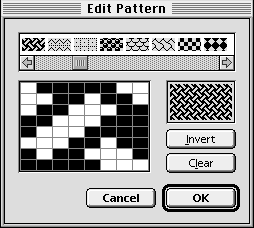
To set the fill pattern: The selected pattern is displayed in the Pattern well. Click its Browse button to select a pattern. The Edit Pattern dialog box will appear.
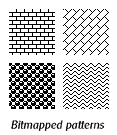
Patterns are a repeated series of dots on a white background. Pattern fills are useful for black and white charts because patterns are more easily discernible than varying shades of grey, but they are not recommended for professional illustration.
To use a preset pattern: Click the desired pattern and then click OK.
To create a custom pattern: Click Clear to start from scratch, or select a pattern to start with. Click to toggle on or off the pattern's dots. Click OK.
To reset the pattern to a solid fill: Select the solid fill pattern at the left of the pattern list. Click OK.
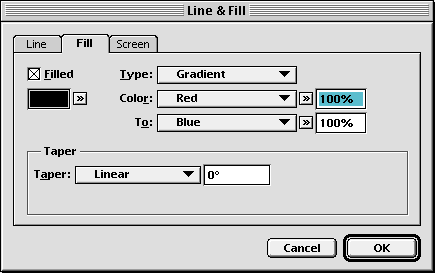
Select Gradient from the Type pop-up menu to display the gradient fill options.
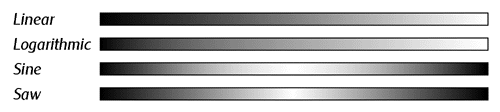
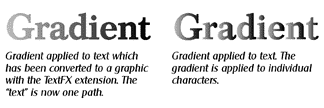
A gradient fill is a smooth variation in color from one part of an object or character to another part. You can set the beginning and ending colors with the Color and To pop-up menus, choose the taper type with the Taper pop-up menu and enter a taper angle in the accompanying text box.
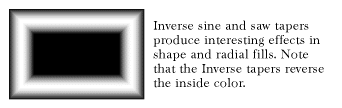
The taper type determines how PageStream blends from one color to the other. The four main types are shown below. Inverses of these types are also available.
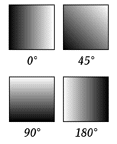
The angle determines the angle of its taper from start to end. A taper of 0 starts from the left side and ends on the right side. Increasing the taper angle rotates the gradient counterclockwise.
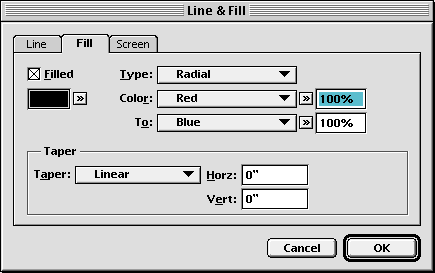
Choose Radial from the Type pop-up menu to display the radial fill options.
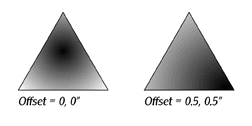
A radial fill is a smooth variation in color from inside to outside of an object or character. Radial fills have concentric circular bands. You can set the beginning and ending colors with the Color and To pop-up menus, choose the taper type with the Taper pop-up menu and enter a horizontal and vertical offset from the center of the object for the center of the fill.
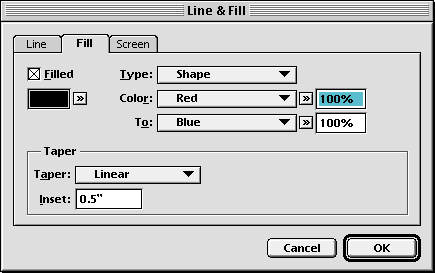
Choose Shape from the Type pop-up menu to display the shape fill options. Shape fills may only be used with PostScript printers and imagesetters.
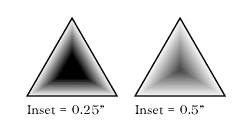
A shape fill is a smooth variation in color from the outside to the inside of an object or character. Shape fills have concentric bands in the shape of the object or character beginning at the path of the shape. You can set the beginning and ending colors with the Color and To pop-up menus, choose the taper type with the Taper pop-up menu, and enter the inset of the fill from the path of the shape. Set the inset to half of the shape size to specify a shape fill for the entire object or character.
When an object other than a solid color is printed, or when a solid color other than black is printed to a black and white printer, it is screened to represent the color intensity. A screen is a pattern of dots which are varied in size to change how much ink is applied to the page. This changes the darkness of the object.
PageStream has default screens which are suitable for most work. The screen values are changed depending on the resolution of the printer. For PostScript printing, PageStream uses the values set in the PostScript Printer Description (PPD) file matching the printer or imagesetter. These values are used for a document as a whole.
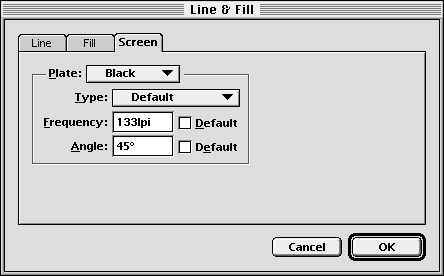
You can override the screen values for individual objects with the Line & Fill dialog box.
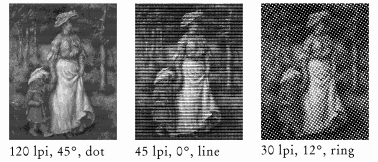
The Plate pop-up menu allows you to select which process plate to modify. The black plate's values are also used for spot colors. The Type pop-up menu is the pattern of the screen. The default pattern varies depending on the output device. PageStream offers several types in addition to the default: dot, line, ring, donut, triangle and propeller. Dot and line are useful at most frequencies, while some of the others are generally used for special effects at low frequencies. The examples below are shown at 15 lines per inch, a very coarse setting.
Angle is the direction of the screen pattern, and frequency is the number of lines, or rows of dots, per inch (lines per inch, or lpi).
45 degrees is normally used for black and spot colors.
The frequency varies with the printer type and resolution, but the default for 300 dpi printers is 60 lpi, and the default for 600 dpi printers is 85 lpi. You can create interesting effects by lowering the frequency to extremely low levels for gradient, radial and shape fills.
You can also set the screen for bitmap pictures by using the Screen button in the Line/Fill dialog box.The examples below show a picture with different screens applied to it.
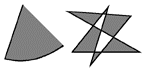
You can fill open and closed paths in PageStream. Open paths will be filled up to the imaginary line joining the start and endpoints.
If a path overlaps itself, the sections which overlap an even number of times will cancel out and will be unfilled.
The parts of the path which overlap will be unfilled, creating transparent holes. If the subpaths do not overlap, no holes will be created but the objects will still be filled as one object. This is useful when working with gradient fills, because the gradient will extend across the width of the composite path, even if the subpaths do not overlap.
PageStream offers several line attributes:
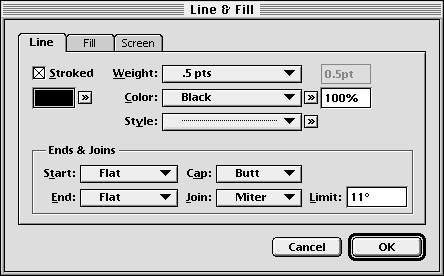
To set the weight: Select a preset width from the Weight pop-up menu or select Other and enter a custom width in the text box. Hairline is defined as 0.3pt.
To set the line color and fill pattern: These options are the same as the equivalent options in the Fill side of the dialog box. Note that lines can have a fill pattern separate from the fill itself.
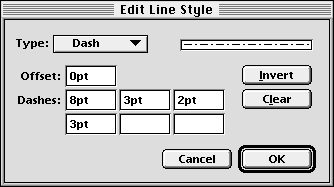
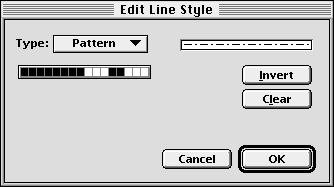
To set the line style: Select a preset line style from the Style pop-up menu or click the Browse button to create a custom line style with the Edit Line Style dialog box. Select the first style for a solid line. Custom line styles can be defined as pattern or dash. When pattern is selected from the type menu, a series of off and on dots define the line style. Each dot normally represents 1pt in length. If dash is selected from the type menu, each segment's length is entered, along with an offset into the line style dash segments.
To set the cap: Select a cap style from the Cap pop-up menu. The cap is the shape of the ends of the line stroke and its dashes. Caps have no effect on closed paths with solid strokes. Butt caps are the default and have flat ends that do not extend beyond the line ends. Square and round caps extend beyond the line ends by half the line weight.
![]()
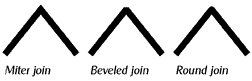
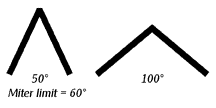
To set the join: Select a Join style from the Join pop-up menu. The join is the shape of the connection of two line segments and is applicable only to paths. Miter joins are the default and have sharp points. Beveled joins are flattened and round joins have smooth ends. Use the miter limit feature to prevent extremely long joins when the angle between the lines is very small.
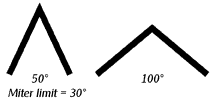
To set the miter limit: Enter the miter limit angle into the Limit text box to specify the smallest angle for a miter join. Angles smaller than the limit will be converted to beveled joins automatically. The default limit is 11.
Arrowheads: Choose arrowhead styles from the Start and End pop-up menus. Unlike caps, arrowheads are only applicable to open paths. If you apply an arrowhead to an object, it will override the cap for line ends. The Start arrowhead style is applied to the start point, and the End arrowhead style is applied to the endpoint. The arrowhead size is dependent on the line weight and extends beyond the line ends.
![]()
PageStream offers several types of arrowheads. The default is flat which is identical to the butt cap style. The examples have flat left ends.

|
|